

I have adapted Ruth's Google Form method from Chapel Hill Snippets (check out her great tutorial) just a bit to make my forms a little more universal. This works great for me since I use my Google Drive for EVERYTHING. It's so useful for managing my documents and data from any location or device.

Yield: 60+ individual student forms and spreadsheets full of DATA!
1 gmail account
1 oz. of patience
a dash of creativity
Instructions:
1. Login to your gmail account and press "Drive" at the top of the page
2. Once you enter your Drive select "Create" and then press "Form" in the top left corner of the page

3. You will then be taken to a window prompting you to choose a title and theme. I like to use my student's name as the form title and something cute for the theme:)

4. Now time to create your form. This part is completely customizable (is that a word?), so I will simply show you how I have found that it works best for me. At the top of my form I include information such as:
Special Education Eligibility:
Related Services:
Current IEP Date:
Current MET Date:
5. For my first entry I want to record student attendance I find that this works best in the down menu (Question Type: Choose from a list).

Fill in required fields:
Question Title: Attendance
Help Text: Record Attendance
Question Type: Choose from a list
1. Present
2. Unable to Participate in Lesson
3. Student Absent
4. Clinician Absent
6. Once fields are complete press "Done" and your drop down will be created.
7. To continue, press "Add Item" near the bottom of the page

8. Repeat steps 5-7 to add additional information
Enter Target Objecitves:

Enter commonly used Activities and Interventions:

Enter Activity Comments (I like to use "Paragraph Text" so that I can enter specific information such as: iPad app used, title of story presented, target vocabulary...)

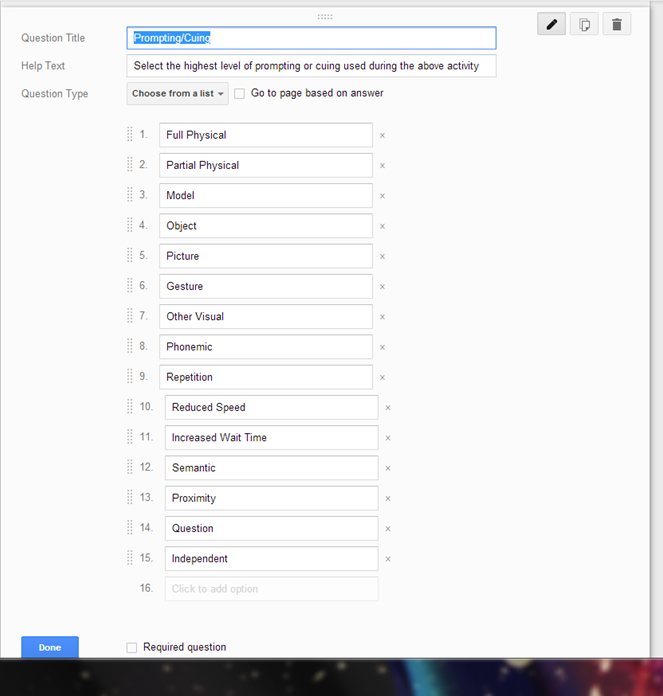
Enter Levels of Prompting or Cuing:
Enter Accuracy (I like to use "Text" so that I can enter an exact percentage):

Finally, I like to add a Paragraph Text to allow me to record any additional comments:

9. Time to send your form.

10. You will then be prompted to choose your recipients. I usually email the form for myself (and maybe the classroom teacher). This allows me to open the form on my PC to save the form to my desktop and on my iPad to save to my homescreen. I can collect data ANYWHERE!

11. Once to select "Done" you will be prompted to "Choose Response Destination." This is where your data will be collected nice and neatly once you press "Submit" on the bottom of your form. You can decide whether you would like to create a new spreadsheet or add a new sheet to an existing spreadsheet. Give your new spreadsheet a name (again, I use my student's name), click create, and Google will generate your sheet which will be saved on your Google Drive.


After 2 submissions, this is what my spreadsheet looked like:
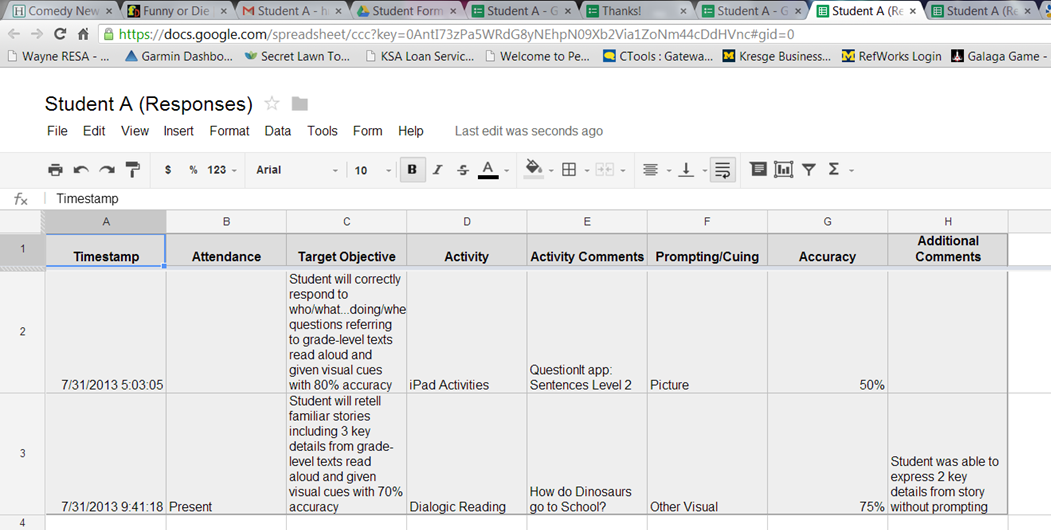
As you can see, Google created a timestamp when i pressed "Submit" on my form and organized all my data into a wonderful little spreadsheet. This really comes in handy when I'm ready to bill Medicaid (copy/paste).
12. One student down, 59 (give or take) left:) This is where a "universal" form comes in handy. It gives you a template that just needs to be slightly modified for each student. To do this, return to the student's form and click "File>Make a Copy"

13. You will then be prompted to name your new form (I usually use the student's name)

15. Make any modifications to personalize the form for you new student (i.e. target objectives, specific activities, specific prompts...).
16. Repeat steps 9-14 for all additional students on your caseload
Phew! I know that it may seem like A LOT of work up front, but once you get the hang of it, it goes quite smoothly. And trust me, it will save you lots of time (and trees) down the road!!
Wow!! You just blew my mind with this! Love reading about alternatives to paper/pencil :) Thank you for linking up!
ReplyDeleteThanks so much! This SLP is going green:)
DeleteOmg this is fantastic! So do you always have a laptop or something by you during every session so you can take notes or do you first record your data on paper and then transfer it?? I would love to try this out this year!
ReplyDeleteAllie
5678communicate.blogspot.com
Hi Allie,
DeleteThanks so much! I typically have my ipad with me at all times, and I recently invested in a keyboard for my ipad which makes this process even easier. I also create shortcuts on my desktop in my office, so I can enter data there as well:)
I keep my data on google docs too very similar to yours and I LOVE IT!!!! I print it out around progress report time and send it home so that parents can see exactly what I'm doing. I also track my minutes on my form so that I know that I served them the amount of minutes per month that their IEP calls for. This is the BEST way of keeping data I have ever found and I have TRIED EVERYTHING!!!!
ReplyDeleteThanks! I love your idea of sending home the forms with progress reports.
DeleteHeather, I love that your entry statement is getting here late to the party. its 2018 and I am finally fed up with paper. Just found your blog and tried to stalk you on the internet. Are you still an SLP in Michigan? Was wondering if you still use paperless and google forms.
DeleteYou are amazing! Thank you for sharing! I just made my first google form. One question - can I print out the individual forms? Our state requires session notes in permanent files. Thanks!
ReplyDeleteThanks so much! Yes, you can print the forms AND the spreadsheets. My state also requires us to have notes in our student files, so I typically print out the spreadsheets at the end of the school year (not so "green", I know).
DeleteWhen you open your Google Response Spreadsheets, there will be a tiny icon that looks like a printer in the top left corner. Let me know if you have any other questions:)
wow! I love this how-to! If only the wi-fi in my school was accessible in my classroom. Then I could use my tablet during sessions for more than just the non-network required apps.
ReplyDeleteThanks a bunch! That does make it a little tricky but not impossible. I also create shortcuts for the forms on my desktop in my office. This way, when I have a couple of minutes (between students, lunch, after school...) I can quickly pull up their form and take my notes. It's not as efficient but it works:)
DeleteIn the target objectives help text area there is an instructional statement that is cut off in the screen shot. It says "If working on multiple objectives, press submit before..." Would you please complete the statement?
ReplyDeleteThanks!
So sorry about that... the completed statement reads: If working on mutiple objectives, press submit before adding data for additional objectives. This is optional. I like to hit submit after tracking data for each objective I am addressing during a session. This is because it will allow me to analyze the student's accuracy for each objective separately. Hope that is helpful. If you need any additional info, feel free to email me: hmarchuck@gmail.com
DeleteThanks:)
I think this is great. My district doesn't allow access to the the wireless network. If I have the google app, can I access the file on my laptop without being connected to the internet?
ReplyDeleteHi Marri,
ReplyDeleteYou will need to be connected to the internet in order to use the Google Forms. However, if you have a desktop that is hooked up to the network, that should work too:)
Thanks for the tutorial. Do you know if there is a way to have more than 1 form open at a time so you can enter data to ore than one student during group sessions?
ReplyDeleteDefinitely. Since the form opens in your internet browser, you are able to have many forms open in different tabs:)
ReplyDeleteI stumbled upon your data post as I was searching for new way to collect data. THIS IS AWESOME! I followed your tutorial and created my first form. Easy peasy! I then opened it on my iphone and entered data. So excited about using these. Thank you for posting.
ReplyDeleteI'm having trouble opening my forms in the Google Drive iPad app? Any help would be awesome!
ReplyDeleteDo you have a set form for Group data using Google forms?
ReplyDeleteSo I created my form I did a trial run from my form in my google drive Then when I tried to add another days of data it says you can only fill out this form once ??? What am I doing wrong thanks
ReplyDeleteHello. I am thinking about trying google forms this year. I had a question though. I currently use student folders to keep data and materials. How do you plan for sessions with this approach. Do you still have materials set aside or planned for each student?
ReplyDeletehow do you look at data or group data based on individual objectives?
ReplyDeleteSo i'm trying this this year to help me keep up with my Medicaid billing. I hope it helps!
ReplyDelete